
Step 1: Configure Azure Database for PostgreSQL Instance
In order to set up pganalyze monitoring for Azure Database for PostgreSQL you’ll need to first follow these steps to enable the pg_stat_statements extension for collecting query statistics.
This guide assumes you have an already running Azure Database for PostgreSQL flexible server you want to monitor.
For Azure Cosmos DB for PostgreSQL Cluster, this step is not required as pg_stat_statements is already preloaded. While the pganalyze collector supports collecting data from Azure Cosmos DB for PostgreSQL, this integration is no longer officially supported. This means that while data collection may work, we cannot guarantee full compatibility, and certain features may not function as expected.
Enabling pg_stat_statements
In your Azure Portal, find your DB instance, and open the Server Parameters
page. Filter parameters by azure.extensions, and enable PG_STAT_STATEMENTS, making sure to save settings.
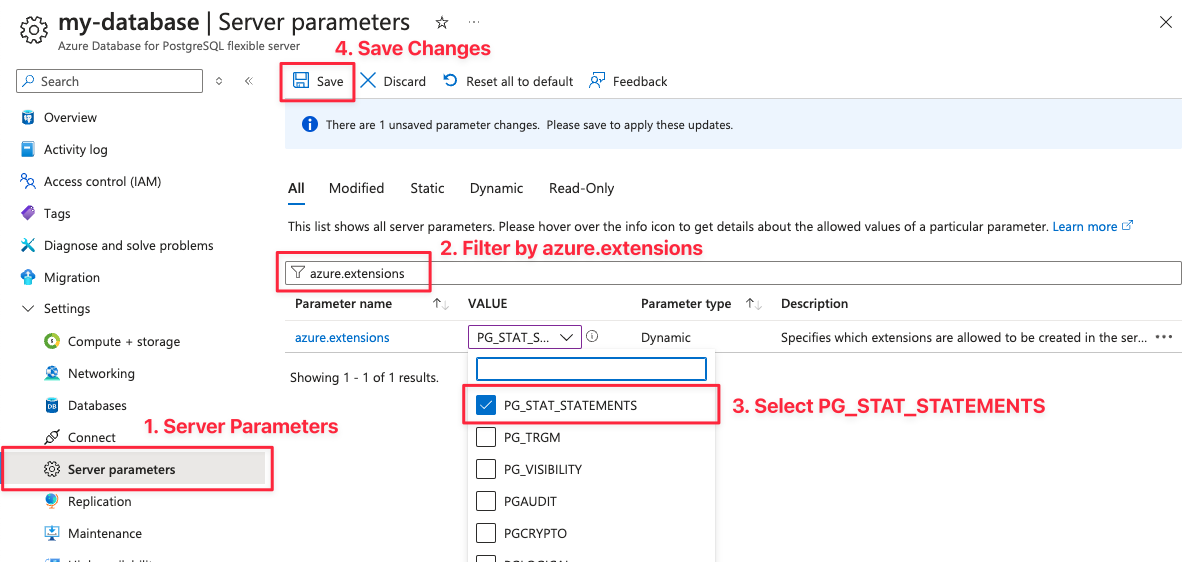
You can also review pg_stat_statements configuration parameters with the Server Parameters page. See Configure PostgreSQL section of Enabling pg_stat_statements for some change recommendations of the pg_stat_statements settings.
Note that this will reboot your database, if you haven’t enabled pg_stat_statements before.
Verify that pg_stat_statements is enabled
Connect to your database as a user with azure_pg_admin privileges (usually the credentials you created the database with), e.g. using psql.
Run the following SQL commands to enable the extension, and make sure it was installed correctly:
CREATE EXTENSION IF NOT EXISTS pg_stat_statements WITH SCHEMA public;
SELECT * FROM pg_stat_statements LIMIT 1;
This should return one row of query statistics information - if it gives an error you might not have restarted your database or changed the configuration correctly.
Continue by creating the monitoring user:
Proceed to Step 2: Create Monitoring User
Couldn't find what you were looking for or want to talk about something specific?
Start a conversation with us →