Enterprise Server: Initial Setup
These are the installation instructions for pganalyze Enterprise Server, which runs fully-contained within your own environment.
The pganalyze container image is mostly self-contained, and runs various services inside the Docker (or podman) container.
- Installation steps
- Pre-requisites
- Step 1: Download the container image
- Step 2: Setting environment variables
- Step 3: Initialize database & verify installation
- Step 4: Create initial admin user
- Step 5: Start web server and log in to pganalyze
- Step 6: Preparing your PostgreSQL database for monitoring
- Step 7: Add your first database to pganalyze
- Next steps
- Appendix: How to apply config changes
Installation steps
Pre-requisites
- Provision a virtual machine
- Assign at least 4GB - 8GB of RAM, 1-2 dedicated CPU cores
- Install Docker or podman on your virtual machine
- pganalyze Enterprise Server is delivered as a container image compatible with Docker / podman
- When using podman, make sure to replace
dockerwithpodmanin the steps below
- Setup a PostgreSQL database that can be used for storing statistics data
- PostgreSQL 11 or newer is required
- 50 GB of dedicated disk space or more
- Optional: If you use the RDS integration, set up an appropriate IAM role that can be used to download logs and system metrics
- You can also assign the required policy to an existing EC2 instance and its instance role
- You will need the collector IAM policy
Step 1: Download the container image
The Docker image is made available to you through the container hosting service quay.io.
You will have received credentials (username and license key) by email from our sales team.
Use the provided credentials like this to access to the image:
docker login -e="." -u="pganalyze+enterprise_customer" -p="REPLACE_ME" quay.ioNote that this will add the login information to your current user's .dockercfg file - you will need this on every host where you'd like to access the image.
You should now be able to pull the pganalyze Enterprise Server Docker image:
docker pull quay.io/pganalyze/enterprise:[version]Please note that [version] should be replaced with the version you are using. We recommend using the latest release.
Step 2: Setting environment variables
The Docker image uses environment variables that are passed in to determine how to access outside services, like PostgreSQL, LDAP and mail servers.
We recommend keeping the environment variables in the file /etc/pganalyze.env.
Here is an example /etc/pganalyze.env file to get you started:
DATABASE_URL=postgres://myusername:mypassword@example.com:5432/mydatabase
LICENSE_KEY=REPLACE_ME
You can find the full explanation of all variables in the settings documentation, for example the MAILER_URL setting which is required to activate email alerts.
Step 3: Initialize database & verify installation
Run the Enterprise self check, to ensure the configuration is correct:
docker run --env-file /etc/pganalyze.env quay.io/pganalyze/enterprise:[version] rake enterprise:self_checkTesting database connection... Success!
Testing Redis connection... Success!
Testing LDAP connection... Success!
All tests completed successfully!In the case of an error this will give you a very verbose error message - please don't hesitate to ask us about it.
Assuming it succeeds, continue by initializing the database schema.
docker run --env-file /etc/pganalyze.env quay.io/pganalyze/enterprise:[version] rake db:structure:loadIf you get permission errors, you may need to create the extensions btree_gist and pgcrypto beforehand. A successful output looks like this:
Jul  2 07:15:16 aa84f55aceba syslog-ng[160]: syslog-ng starting up; version='3.13.2'
Jul  2 07:15:17 aa84f55aceba cron[180]: (CRON) INFO (pidfile fd = 3)
Jul  2 07:15:17 aa84f55aceba cron[180]: (CRON) INFO (Running @reboot jobs)
 set_config
------------

(1 row)

Jul  2 07:15:22 aa84f55aceba syslog-ng[160]: syslog-ng shutting down; version='3.13.2'
Step 4: Create initial admin user
Create the initial user:
docker run --env-file /etc/pganalyze.env quay.io/pganalyze/enterprise:[version] rake db:seedMake sure to note down the default user email and password:
Jul  2 07:15:29 8bc5a4c0e6b6 syslog-ng[150]: syslog-ng starting up; version='3.13.2'
Jul  2 07:15:30 8bc5a4c0e6b6 cron[167]: (CRON) INFO (pidfile fd = 3)
Jul  2 07:15:30 8bc5a4c0e6b6 cron[167]: (CRON) INFO (Running @reboot jobs)
I, [2020-07-02T07:15:35.006455 #159]  INFO -- : *****************************
I, [2020-07-02T07:15:35.006520 #159]  INFO -- : *** INITIAL ADMIN CREATED ***
I, [2020-07-02T07:15:35.006538 #159]  INFO -- : *****************************
I, [2020-07-02T07:15:35.006551 #159]  INFO -- :
I, [2020-07-02T07:15:35.006563 #159]  INFO -- : *****************************
I, [2020-07-02T07:15:35.006599 #159]  INFO -- : Email:    admin@example.com
I, [2020-07-02T07:15:35.006619 #159]  INFO -- : Password: abcdefabcdef
I, [2020-07-02T07:15:35.006636 #159]  INFO -- : *****************************
I, [2020-07-02T07:15:35.006648 #159]  INFO -- :
I, [2020-07-02T07:15:35.006660 #159]  INFO -- : Use these credentials to login and then change email address and password.
Jul  2 07:15:35 8bc5a4c0e6b6 syslog-ng[150]: syslog-ng shutting down; version='3.13.2'
Step 5: Start web server and log in to pganalyze
You can now start the Docker image in the background using this command:
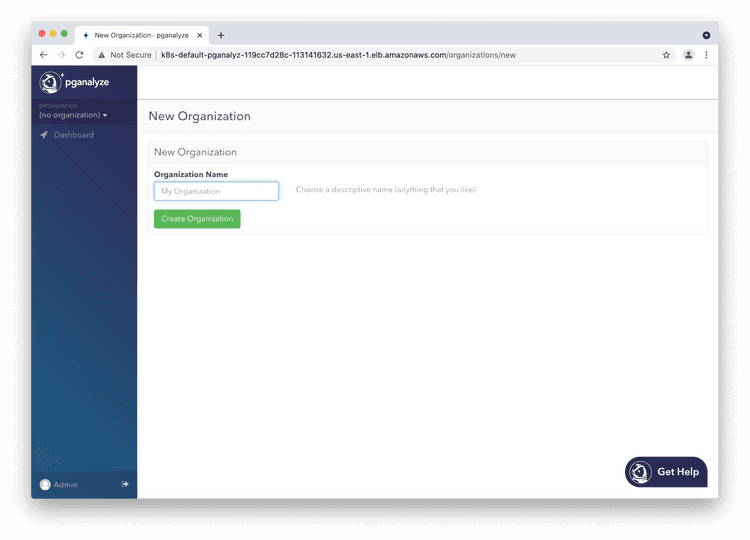
docker run -d --name pganalyze --env-file /etc/pganalyze.env -p 8080:5000 quay.io/pganalyze/enterprise:[version]This will make the web interface accessible on the server's address, on port 8080. You should see a site like this when you open your web browser for that address and port:
Now you can log in to the pganalyze interface using the generated credentials you've seen earlier when setting up the database. If successful you should see this screen:
If authentication does not work, or you see an error message, please check the container's logs using docker logs.
Choose an organization name of your choice (typically your company name), and then click "Add Server" on the next screen.
Step 6: Preparing your PostgreSQL database for monitoring
Before you can add a database to the pganalyze installation, you'll need to enable the pg_stat_statements extension on it.
This extension is bundled with PostgreSQL and allows you detailed query monitoring. Its overhead on the database system is minimal, and it is required to use pganalyze.
Please see self-hosted systems or Amazon RDS instructions on how to add it to your database.
In addition you will need to either use the database superuser (usually "postgres") to give pganalyze access to your database, or create a special restricted monitoring user.
You don't need to run anything else on your database server - the pganalyze container will connect to your database at regular intervals to gather information from PostgreSQL's statistics tables.
Step 7: Add your first database to pganalyze
You can now either:
- Use the integrated collector in the Enterprise Server image (works best for Amazon RDS / Aurora)
- Use a separate collector installation (recommended all other environments)
To do so, follow the instructions shown in pganalyze on the "Add Server" page.
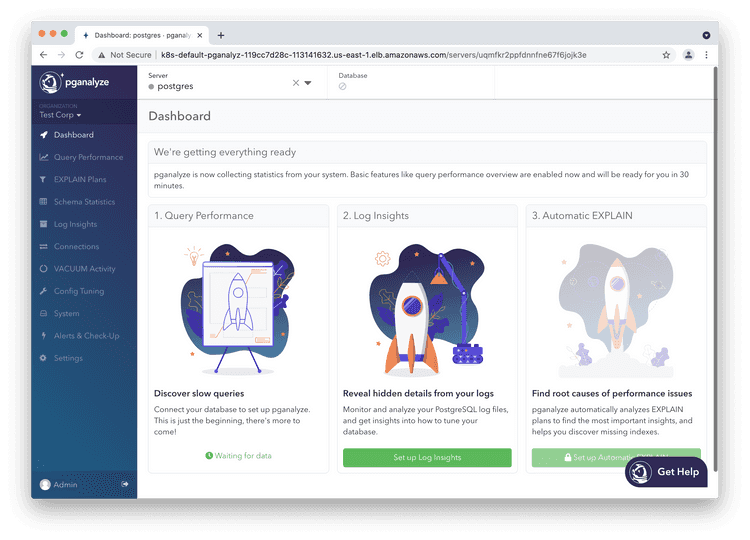
After adding a database server through one of these methods, initially, until sufficient information is available, your screen will look like this:
You can check whether any information has been received by clicking the "Server Settings" link in the left navigation, and scrolling down to the "Debug Info" section:
Once data is coming in successfully, the "Debug Info" looks like this:
Important: Be aware that some graphs need at least a few hours worth of data and might not work properly before.
Next steps
To learn more about adding additional team members, see Account Management.
We also recommend changing both the email and password of the admin user initially created (you can do so by clicking on "Admin" in the lower left of the screen).
Additionally, you can review all configuration settings for the Enterprise container.
Appendix: How to apply config changes
When you make changes to the pganalyze container configuration in /etc/pganalye.env, make sure to fully restart the container afterwards, like this:
docker stop pganalyze
docker rm pganalyze
docker run -d --name pganalyze --env-file /etc/pganalyze.env -p 8080:5000   quay.io/pganalyze/enterprise:[version]
Couldn't find what you were looking for or want to talk about something specific?
Start a conversation with us →


