
Step 3: Install the Collector
Installing the collector on an Amazon EC2 Instance
For this step, you first need to choose whether you want to install the collector on an existing EC2 instance, or run a new one.
The pganalyze collector is a daemon process that continuously collects database statistics, and submits them to the pganalyze dashboard in recurring intervals.
You can either run it on a small instance (a t3.small suffices), or add it to an existing EC2 instance in your environment.
Set up IAM policy
You need to set up an IAM policy for the instance where the collector will run, so that the collector can access RDS information.
Save the following policy JSON to a file named pganalyze_collector_policy.json:
{
    "Version": "2012-10-17",
    "Statement": [
        {
            "Action": [
                "cloudwatch:GetMetricStatistics"
            ],
            "Effect": "Allow",
            "Resource": "*"
        },
        {
            "Action": [
                "logs:GetLogEvents"
            ],
            "Effect": "Allow",
            "Resource": "arn:aws:logs:*:*:log-group:RDSOSMetrics:log-stream:*"
        },
        {
            "Action": [
                "rds:DescribeDBParameters"
            ],
            "Effect": "Allow",
            "Resource": "arn:aws:rds:*:*:pg:*"
        },
        {
            "Action": [
                "rds:DescribeDBInstances",
                "rds:DownloadDBLogFilePortion",
                "rds:DescribeDBLogFiles"
            ],
            "Effect": "Allow",
            "Resource": "arn:aws:rds:*:*:db:*"
        },
        {
            "Action": [
                "rds:DescribeDBClusters"
            ],
            "Effect": "Allow",
            "Resource": "arn:aws:rds:*:*:cluster:*"
        }
    ]
}
Now, create a new IAM policy named pganalyze using the saved JSON file:
aws iam create-policy \
    --policy-name pganalyze \
    --policy-document file://pganalyze_collector_policy.json \
    --description "Allow the pganalyze collector to access RDS information"
Go to Create IAM policy, select JSON and then paste the following policy:
{
    "Version": "2012-10-17",
    "Statement": [
        {
            "Action": [
                "cloudwatch:GetMetricStatistics"
            ],
            "Effect": "Allow",
            "Resource": "*"
        },
        {
            "Action": [
                "logs:GetLogEvents"
            ],
            "Effect": "Allow",
            "Resource": "arn:aws:logs:*:*:log-group:RDSOSMetrics:log-stream:*"
        },
        {
            "Action": [
                "rds:DescribeDBParameters"
            ],
            "Effect": "Allow",
            "Resource": "arn:aws:rds:*:*:pg:*"
        },
        {
            "Action": [
                "rds:DescribeDBInstances",
                "rds:DownloadDBLogFilePortion",
                "rds:DescribeDBLogFiles"
            ],
            "Effect": "Allow",
            "Resource": "arn:aws:rds:*:*:db:*"
        },
        {
            "Action": [
                "rds:DescribeDBClusters"
            ],
            "Effect": "Allow",
            "Resource": "arn:aws:rds:*:*:cluster:*"
        }
    ]
}
We recommend naming the policy “pganalyze” or similar, so you can easily identify it again.
This policy grants the following access:
- RDS metadata used to discover general instance information
- Cloudwatch metrics to show CPU utilization and other system metrics in pganalyze
- RDS log file download (for pganalyze Log Insights)
To learn more about each access, see Amazon RDS and Aurora: IAM Policy.
Create IAM role
Next, you need to create an IAM role using the policy just created.
The following command creates a new IAM role named pganalyze:
aws iam create-role \
  --role-name pganalyze \
  --description "pganalyze collector" \
  --assume-role-policy-document '{"Version": "2012-10-17", "Statement": [{"Effect": "Allow", "Principal": {"Service": "ec2.amazonaws.com"}, "Action": "sts:AssumeRole"}]}'
Then, attach the IAM policy to the created role:
aws iam attach-role-policy \
  --role-name pganalyze \
  --policy-arn arn:aws:iam::123456789012:policy/pganalyze
Make sure to replace arn:aws:iam::YOURAWSACCOUNTID:policy/POLICYNAME with the
correct policy ARN you created earlier.
Go to Create IAM role, pick the following for the trusted entity:
- Trusted entity type: AWS service
- Use case: EC2
For the permission, choose the policy you just created above. We recommend also naming the role “pganalyze” or similar.
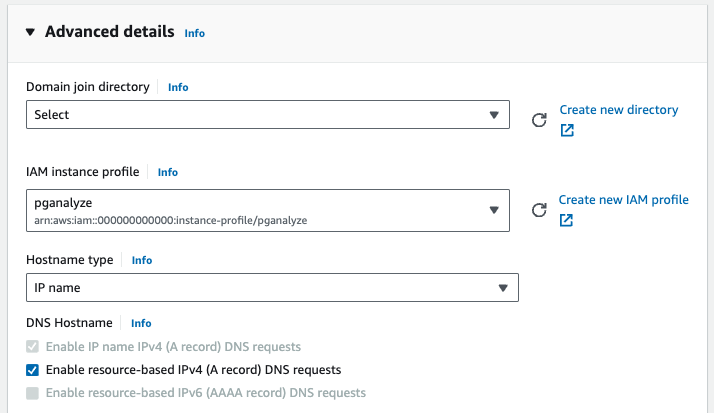
If you are going to use the existing EC2 instance, attach the created IAM role to the EC2 instance.
Start a new EC2 instance
Start a new t3.small instance, Amazon Linux 2 based, that has the created IAM role applied:
Then follow the step to install the collector on Amazon Linux 2 based instances.
Install the collector on the instance
We recommend running our install script to automatically detect your platform and install the correct package:
curl https://packages.pganalyze.com/collector-install.sh | bashAlternately, you can follow the manual install instructions.
After successful installation the pganalyze collector will now be running in the background on your instance.
Proceed to Step 4: Configure the Collector
Couldn't find what you were looking for or want to talk about something specific?
Start a conversation with us →